Archives

Showing posts with label SharePoint 2010. Show all posts

Wednesday, June 15, 2011

Conditional Formatting of List Views for SharePoint 2010 – Changing the Font Colour

Cross-posted from Jason Lee's Blog

There are often times when it's useful to draw attention to particular items in a SharePoint list or library. For example, you might want to highlight overdue tasks, colour-code items according to priority, or draw attention to undesirable information. In other words, you want to apply conditional formatting based on field values. Now, as you probably know, SharePoint 2010 uses XSLT-based list views by default. By editing the XSLT for a list view you can apply all manner of rules and conditional formatting. Even better, SharePoint Designer 2010 includes some built-in tools that will figure out the XSLT for you. In the List View Tools tab group, on the Options tab, there's a handy dropdown menu:


In most cases, you're probably going to want to apply conditional formatting by row. First you set your conditions:


Then you choose the styles you want to apply when the conditions are met.


When you've set your style, SharePoint Designer modifies the XSLT so that your formatting is rendered as an inline style on the row (<tr>) element when your conditions are met. I've stripped out some of the less relevant attributes to improve readability.


<tr>
  <xsl:attribute name="style">
    <xsl:if test="normalize-space($thisNode/@Status1) != 'Published'
                  and ddwrt:DateTimeTick(ddwrt:GenDisplayName(
                  string(
$thisNode/@Target_x0020_Pub_x0020_Date1)))
                  &lt;= ddwrt:DateTimeTick(ddwrt:GenDisplayName(

                  string($Today)))">
      background-color: #FFD7D7;

      color: #FF0000 !important;
      font-weight: bold;
    </xsl:if>
  ...
 

So far so good. Everything looks correct in SharePoint Designer. However, if you've tried this, you might have found that when you load the list view in the browser you get mixed results – in particular:
  • Changing background colours and text decorations (such as bolding or italics) works fine.
  • Changing fonts or font colours works in SharePoint Designer but doesn't work in the browser.
As a result, you'll end up with something like this when you view the list through the browser:


A quick web search revealed that I'm not the first person to encounter this, and I've yet to see a definitive answer, so here goes.

Short version – the problem is down to the way the default styles are structured in corev4.css. Row styles do not cascade down to individual cells (regardless of whether you append an !important flag). If you want to change the background colour, apply conditional formatting at the row level. If you want to change the font colour, and you don't fancy messing around with CSS, apply conditional formatting at the column level.

Long version – read on for a more detailed explanation…

Using IE Developer Tools, you can take a look at how styles are applied to individual HTML elements on the page. The XSLT rule created by SharePoint Designer applies an inline style to a row (tr) element. If we use IE Developer Tools to look at how the row is styled, we can see that everything looks correct – the inline style takes precedence:


However, if we look at how the text within one of the individual cells is styled, you can see that our inline style at the tr level is getting overridden by a more specific style, defined by the ms-vb2 class, at the td level.


Unfortunately there's not much we can do about this. If you want to modify any of the styles defined by the ms-vb2 class, such as font, font size and font colour, you need to create a column-level rule rather than a row-level rule. The two types of rules work in exactly the same way in SharePoint Designer—when you create a column-level rule, you can still set conditions based on any field value, not just the column to which you are applying the conditional formatting. If you want to conditionally change the font colour of an entire row, you simply create a column-level rule on every column. This time, SharePoint Designer modifies the XSLT so that your formatting is rendered as an inline style on the column (<td>) element when your conditions are met:

<td>
  <xsl:attribute name="style">
    <xsl:if test="ddwrt:DateTimeTick(ddwrt:GenDisplayName(


                  string($thisNode/@Target_x0020_Pub_x0020_Date1)))
                  &lt;= 
ddwrt:DateTimeTick(
                  ddwrt:GenDisplayName(string($Today)))">
      color: #FF0000;
    </xsl:if>
  </xsl:attribute>

  ...

This time the browser will render the view as expected. The following image shows the results of a column-level rule on the Target Pub Date column, in addition to the row-level rule described earlier.


If we take a look at the CSS, we can see that our inline column style is overriding the styles provided by ms-vb2.
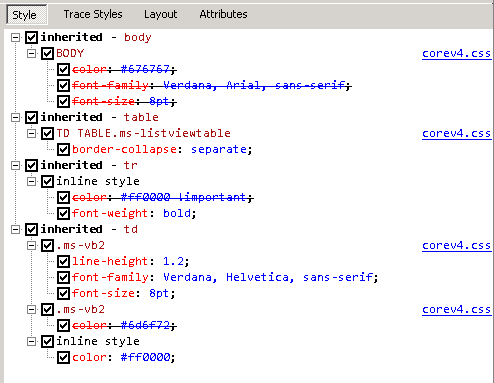


In summary, there's no real difference between row-level conditional formatting and column-level conditional formatting, other than the scope at which your inline styles are applied. In practice you may often need to use a combination of the two in order to realise a particular style or effect.
Read More >>

Monday, May 16, 2011

List Relationships and Cascading Dropdowns in SharePoint and InfoPath

Cross-posted from Jason Lee's Blog

Here's the situation. I have two lists on a SharePoint 2010 site – let's call them Product Categories and Products. The Products list includes a lookup column that points to the Product Categories list, so users can associate a category with a product. I need to use these lists to provide choices that users can select from within an InfoPath 2010 form. This is how I want the form to work:
  • The user selects a product category from a dropdown list.
  • The form filters the list of products based on the selected category.
  • The user selects a product from the filtered list of products.
This might sound trivial, but it took me a while to work out the nuances and it doesn't seem to be particularly well documented anywhere, so I figured I'd share it. Essentially, InfoPath 2010 includes a new feature that allows you to specify query fields when you connect to a SharePoint list. This allows you to create cascading dropdowns without resorting to custom code, custom data sources or Web services.

Here's a walkthrough of the process. Remember that Product Categories is our "master" list and Products is our "details" list. I'll assume a rudimentary knowledge of InfoPath in that you're familiar with data connections, binding controls to fields and so on.

First, create a secondary data connection to the Product Categories list. This is straightforward, the list only contains one field. Ensure that you leave the Automatically retrieve data when form is opened option selected.


Next, create a data connection to the Products list. When you select the fields you want to include, ensure you select the Category (lookup) field as well as the Product field.


On the last page of the wizard, ensure you clear the Automatically retrieve data when form is opened option, and then click Finish. We don't want the form to retrieve a list of products until we've specified the category value we want to use as a filter.


Build your form template. I've used dropdown lists to represent the product category and the product. Both controls are bound to simple text fields in the main data source.


In the properties for the Product Category control, configure the dropdown to retrieve choices from the Product Categories data source that you created in step 1.


Ensure that you select the ID column as the Value field. (Lookup columns only store the ID field from the related list, so we'll need to match these ID values to the category lookup in the Products list).

In the properties for the Products control, configure the dropdown to retrieve choices from the Products data source that you created in step 2. (Note that the data source is actually called PLC Products in my screen captures.)


At this point, the controls are set up to:
  • Retrieve choices from our SharePoint lists.
  • Store the user selections in the main data source.
We can now use InfoPath rules to set up the cascade filtering we're looking for. Select the Category control. On the Home tab, on the Add Rule dropdown, click This Field Changes, and then click Set a Field's Value. This launches the Rule Details dialog.

Click the button to the right of the Field text box. In the Select a Field or Group dialog, select the Products data connection, expand queryFields, select the Category field, and then click OK.


By setting the value of this field, we are configuring the Products data connection to only return product records where the product category matches our specified value.

Click the function button to the right of the Value text box, and then click Insert Field or Group. Ensure the Main data connection is selected, select the field that stores the product category value selected by the user, and then click OK.


We have now set the value of our query field to the ID of the category selected by the user. The Rule Details dialog should resemble the following.


Click OK to close the Rule Details dialog. Now that we've set our query field, we can call on the Products data connection to populate the Products dropdown list. In the Rules pane, on the Add dropdown, click Query for data.


Under Data connection, select Products, and then click OK.


Now, when the user selects a category from the Product Category dropdown, the products list is automatically restricted to those products with a matching category value. It's easy once you know how…


If I could emphasise one key point, it's this... ensure you set the value of your query field before you retrieve the data :-)

Read More >>

Monday, April 18, 2011

Specifying Content Types from the SharePoint 2010 Silverlight Client Object Model

Cross-posted from Jason Lee's Blog

A few weeks ago, I wrote about how you can use the Silverlight client object model to upload files to a SharePoint document library. One of the limitations of this process is that it doesn't allow you to specify a content type or provide any metadata for the document you're uploading. In this post, I look at how you can programmatically provide this missing information.

As with most client-side operations for SharePoint 2010, the process is a little more complex from a Silverlight client than from a managed .NET client, as many useful methods and properties are unavailable. From a Silverlight client, you need to use the following high-level steps:

  • Upload the file
  • Retrieve the list item corresponding to the file
  • Update the field values of the list item to set the content type and any other required metadata

Let's take a look at how this works in code. Because we're working with a document library, you must upload the file as the first step –SharePoint won't allow you to create a list item first and upload the document when you're finished providing metadata. I covered uploading a document in a fair amount of detail last time, so let's assume we've done that already. The next step is to retrieve the list item that SharePoint created when we uploaded the document.

Since we need to execute more than one query, it's easier to queue our logic to run on a background thread. This means we can execute queries synchronously rather than creating multiple nested callbacks, which get difficult to untangle after a while.

ClientContext context = ClientContext.Current; System.Threading.ThreadPool.QueueUserWorkItem(
   new System.Threading.WaitCallback(UpdateMetadata), context);

In the callback method, the first step is to submit a CAML query that retrieves the list item corresponding to our document. Notice that we also load the collection of available content types. You'll see why in a bit.

private void UpdateMetadata(object state)
{
   ClientContext context = (ClientContext)state;
   Web web = context.Web;
   List list =
      context.Web.Lists.GetByTitle("My Document Library");
   CamlQuery query = new CamlQuery();
   query.ViewXml = @"
      <View>
         <Query>
            <Where>
               <Eq>
                  <FieldRef Name='FileLeafRef'/>
                  <Value Type='Text'>Sample.txt</Value>
               </Eq>
            </Where>
         </Query>
         <RowLimit>10</RowLimit>
      </View>";
   ListItemCollection items = list.GetItems(query);
   context.Load(items);
   ContentTypeCollection contentTypes =
      context.Web.AvailableContentTypes;
   context.Load(cts);
   context.ExecuteQuery();

Let's assume we want to assign an arbitrary content type named "Chapter" to our list item. To set the content type of a list item, we need to set the value of the ContentTypeId field. In the Silverlight client object model, the ContentTypeCollection class doesn't allow you to use the name of the content type as an indexer. Instead, we can use a simple LINQ expression to get the ID of our Chapter content type.

   var ctid = from ct in contentTypes
              where ct.Name == "Chapter"
              select ct.Id;

We can now set the content type of our document and provide any required metadata.

   ListItem item = items[0];
   item["ContentTypeId"] = ctid;
   item["PublishingContactName"] = "Jason L";
   item["PublishingContactEmail"] = "jason@example.com";
   item.Update();
   context.ExecuteQuery();
}

In a real-world application, you'd obviously need to check that your query returned one unique list item, build in error handling, and so on. However, hopefully this provides enough information to get you started.

Read More >>

Wednesday, March 23, 2011

Using the SharePoint 2010 Silverlight Client Object Model to Update Documents

Cross-posted from Jason Lee's Blog

Earlier this month, I blogged on how you can use the Silverlight client object model to retrieve files from a SharePoint document library. This time, let's take a look at how you can add or update files in a document library from Silverlight.

Just like the process for retrieving files, the process for adding or updating files differs between managed .NET clients and Silverlight clients. The Silverlight client object model does not support the File.SaveBinaryDirect method, so the recommended approach for managed clients is not available to us. From a Silverlight client, the high-level process is as follows:

  • Convert the contents for your new file to a byte array
  • Create a FileCreationInformation instance to represent the new file
  • Add the file to a folder in a document library

The code should resemble the following:

ClientContext context = ClientContext.Current;
String fileContents = "This is the contents of my file";
String fileUrl = String.Format(@"{0}/{1}/{2}/{3}",
   new String[]
      {context.Url, libraryPath, folderName, filename});

//Convert the file contents to a byte array
System.Text.UTF8Encoding encoding =
   new System.Text.UTF8Encoding();
Byte[] fileBytes = encoding.GetBytes(fileContents);

//Create an object to represent the file
FileCreationInformation fileCreationInfo =
   new FileCreationInformation();
fileCreationInfo.Url = fileUrl;
fileCreationInfo.Content = fileBytes;
//Overwrite the file if it exists, create if it doesn't
fileCreationInfo.Overwrite = true;

//Add the file to a library
List targetList =
   context.Web.Lists.GetByTitle("My Document Library");
targetList.RootFolder.Files.Add(fileCreationInfo);
targetList.Update();
context.ExecuteQueryAsync(SaveFileSucceeded,
   SaveFileFailed);

And that's how you save a file to a SharePoint document library. You don't need to do anything specific in the callback methods, other than check for errors or report success back to the user. Note that you don't need to add your file to a specific folder in the document library—you can simply add it to the root folder, and SharePoint will use the URL you provided to put it in the right place. Unlike the server-side object model, the Silverlight client object model doesn't expose a collection of files on the Web object.

One limitation of this approach is that it doesn't allow you to specify a content type or provide any metadata for the file. I plan to look a little deeper into this in a later post.

Read More >>

Thursday, March 17, 2011

Using the SharePoint 2010 Silverlight Client Object Model to Retrieve Documents

Cross-posted from Jason Lee's Blog

This week I've been working on migrating a Silverlight application to SharePoint 2010. The application in question uses some fairly complex XML files as a data source, and currently relies on a custom Web service to retrieve and update these files. We want to modify the application to retrieve the XML files from a SharePoint 2010 document library. MSDN provides a good article on how to use the managed .NET client object model for SharePoint 2010 to retrieve and update documents in a SharePoint document library. However, this scenario becomes a little more challenging from a Silverlight client, as some of the required classes are unavailable in the Silverlight version of the client object model.

When you work with the managed client object model, the recommended approach for retrieving the contents of a file is to call the synchronous File.OpenBinaryDirect method. This returns a FileInformation instance that exposes the contents of the file as a stream. However, the FileInformation class is not included in the Silverlight client object model. Instead, the Silverlight client object model includes an alternative, asynchronous version of the File.OpenBinaryDirect method. This returns null, but exposes the contents of the file as a stream through the event arguments in a callback method.

Let's take a look at the code. Suppose we want to retrieve both the metadata for the file and the contents of the file.

ClientContext context = ClientContext.Current;
List targetList =
context.Web.Lists.GetByTitle("My Document Library");
CamlQuery query = new CamlQuery();
query.ViewXml =
   @"<View Scope='RecursiveAll'>
      <Query>
         <Where>
            <Eq>
               <FieldRef Name='FileLeafRef' />
               <Value Type='Text'>input.xml</Value>
            </Eq>
         </Where>
      </Query>
   </View>";

ListItemCollection targetListItems = targetList.GetItems(query);
context.Load(targetListItems);
context.ExecuteQuery();

We can now retrieve document metadata from the list item. For example, we could use the following code to establish when the document was created.

if(targetListItems.Count == 1)
{
   ListItem item = targetListItems[0];
   DateTime createdDate =
      Convert.ToDateTime(item["Created_x0020_Date"]);
}

To get the contents of the file, we use the Microsoft.SharePoint.Client.File.OpenBinaryDirect method and specify callback methods:

String serverRelativeUrl =
   @"/sitename/libraryname/foldername/input.xml";
File.OpenBinaryDirect(context, serverRelativeUrl,
   OnOpenSucceeded, OnOpenFailed);

In the callback method, we can read the contents of the file from the stream and do something useful with it.


private void OnOpenSucceeded(object sender, OpenBinarySucceededEventArgs args)
{
   StreamReader strReader = new StreamReader(args.Stream);
   String fileContents = strReader.ReadToEnd();
   strReader.Close();

   //Do something with the file contents
}

In a nutshell, that's how you retrieve SharePoint 2010 documents from a Silverlight client. Note that I used the synchronous ExecuteQuery method, rather than the asynchronous ExecuteQueryAsync method, to send my queries to the server. Silverlight will not allow you to block the UI thread, so if you want to use this approach you need to run your code on a background thread (for example, by using ThreadPool.QueueUserWorkItem to invoke your logic). You might find this approach preferable if you need to send multiple queries to the server—otherwise you can end up with a tangled web of nested callback methods.

Next time, I'll take a look at creating, updating, and deleting documents from a Silverlight client.

Read More >>

Monday, February 28, 2011

Understanding List Query Throttling Limits in SharePoint 2010

By now, most SharePoint developers will have come across the list query throttling settings in SharePoint 2010. Essentially, farm administrators can impose limits on the number of items returned by list queries, in order to protect the performance of the farm as a whole. Limits are applied on a per-Web application basis and are typically managed through the Web application settings in Central Admin.


So far, so good. The concepts of query throttling are well documented, and the rationale will be obvious to anyone who has seen a SharePoint environment grind to a halt under heavy-handed list queries. (For a good explanation of query throttling, together with information on how you can avoid hitting the limits through careful indexing, take a look at Query Throttling and Indexing by the patterns & practices team.) However, it's not always entirely clear how these settings are applied.

First of all, "administrators" is a loose term. Let's clarify who qualifies as "auditors and administrators" for the purposes of these settings. Site collection administrators do not qualify. Farm administrators do not qualify. The only people who qualify are users who have specific permission levels assigned at the Web application level. Specifically, the policy level assigned to the user must include the Site Collection Administrator or the Site Collection Auditor permissions, as shown below.


Now for the bit that took me a little longer to grasp. What does the object model override actually do? Firstly, it doesn't allow you to submit database queries that hit an unlimited number of rows in the database. Secondly, it doesn't change the list view threshold for regular users at all. All the object model override does is allow our auditors and administrators, as defined by the Web application user policy, to submit queries at the higher threshold value. In other words, if you don't use the object model override, auditors and administrators are stuck with the same standard list view threshold as everyone else.

To dig a little deeper into how these thresholds are applied, I provisioned a basic list and used a feature receiver to add 10,000 items. This puts me nicely between the lower threshold and the upper threshold. Next, I created a Web Part that attempts to retrieve all the items from the list. The core code is as follows:

SPWeb web = SPContext.Current.Web;
SPList list = web.Lists["BigList"];
SPQuery query = new SPQuery();
query.QueryThrottleMode = SPQueryThrottleOption.Override;
SPListItemCollection items = list.GetItems(query);
litMessage.Text = String.Format("This list contains {0} items", items.Count);


The important bit is the 4th line down:

query.QueryThrottleMode = SPQueryThrottleOption.Override;

The SPQueryThrottleOption enumeration has three values: Default, Override, and Strict. If you use the default value, the standard list view threshold applies to all users except local server administrators, who are not bound by either threshold. If you set the query throttle mode to Override, users who have the required permissions in the Web application user policy can query at the higher "auditors and administrators" threshold. Local server administrators remain unbound by either threshold. Finally, if you set the query throttle mode to Strict, this closes down the local server administrator loophole and the standard list view threshold applies to all users.

The following table shows which threshold applies to which users for each of the SPQueryThrottleOption values:

Type of userDefaultOverrideStrict
Site memberStandardStandardStandard
Site ownerStandardStandardStandard
Site collection adminStandardStandardStandard
Web app policy: site collection adminStandardHigherStandard
Web app policy: site collection auditorStandardHigherStandard
Farm adminStandardStandardStandard
Local server adminUnlimitedUnlimitedStandard

Finally, I found an interesting quirk for local server admins. The list view threshold exemptions for local server administrators apply only to users who are explicit members of the Administrators group on the local server. For example, domain admins are implicit members of the local Administrators group by virtue of their membership of the Domain Admins group. However, the standard list view threshold applied to my test domain admin account.

I hope this helps to clarify things for anyone else who's confused by list view thresholds. If you want to know more, Steve Peschka's blog is the best source of information I've seen in this area.

Cross-posted from Jason Lee's Blog

Read More >>